This pattern allows you to create a stylish and functional trivet that will protect your surfaces from hot cookware while adding a handmade touch to your kitchen. With clear, step-by-step instructions, you’ll be able to crochet a durable, heat-resistant pot stand in no time. Whether you’re crafting for your own home or looking for a thoughtful, homemade gift, this pattern is a great way to combine creativity with practicality
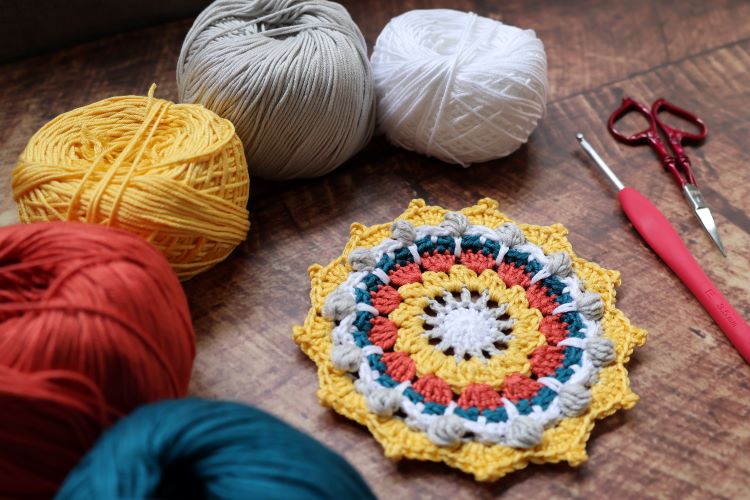
Tools and Materials you will need to make Crochet Hot Pot Stand
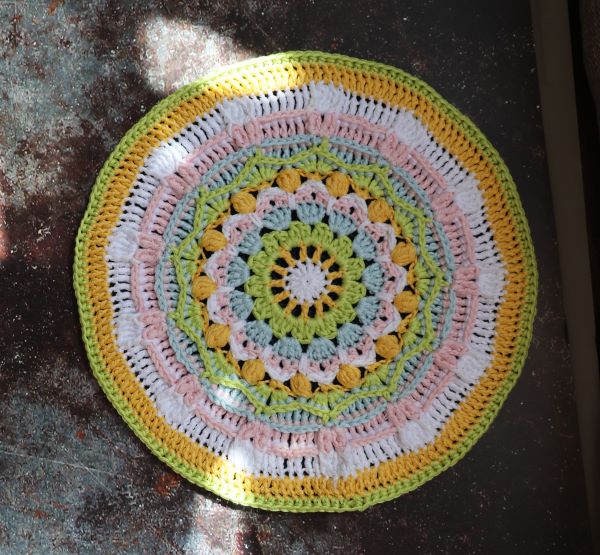
- Rico Designs “Essentials Cotton” DK, colour combo 1:
- Main Colour = Midnight Blue (49) – you will use more than a half of a ball to crochet one side
- A = White (80)
- B = Banana (63)
- C = Pistachio (86)
- D = Light Blue (27)
- E = Rose (01)
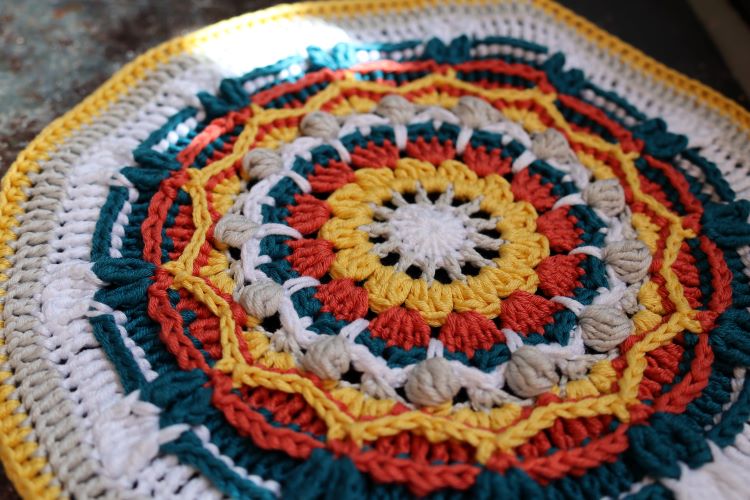
- Colour Combo 2:
- Main colour = Navy (38)
- A = White (80)
- B = Silver Grey (24)
- C = Banana (63)
- D = Terracotta (76)
- E = Alga (73)
- 3 mm crochet hook (5/O)
- Scissors
- Tapestry needle
Gauge: Round 3 = 5.5 cm before blocking
Abbreviations (US Terms)
- Ar. – around
- Tog. – together
- Init. – initial
- MR – magic ring
- SLST – slip stitch
- SP – space
- ST – stitch
- Ch – chain
- SC – single crochet
- HDC – half double crochet
- CSDC – Chainless standing double crochet
- DC – double crochet
- 2DCtog – 2 unfinished DC crochet together
- FPSC – front post single crochet
- 2FPTRtog – crochet 2 unfinished front post treble crochet together
- BPSC – back post single crochet
- BPDC – back post double crochet
- BPTR – back post treble crochet
- BPDTR – back post double treble crochet
- Picot ST – Chain 3, insert your hook in the third chain from the hook. Yarn over (yo) and draw the yarn through the stitch and through the loop on the hook. You’ve completed one picot stitch.
- Bobble ST – Crochet 5 unf. DC together in one ST
- Spike SC – Insert your hook into named row and pull out a long loop level with current round and work SC as normal.
Part 1 – crochet Plain circle for the back of the work. Use main colour.
Crochet Hot Pot Stand Pattern
Round 1
- Make MR.
- Ch3 (counts as DC), crochet 12 DC in MR.
- Join with SLST into 3rd Ch of init. ST.
- Total 13 DC – double check number of stitches!
Round 2
- Start next Round with CSDC into init. ST + DC in the same ST.
- Make 2 DC in every ST until the end of the round.
- Join with SLST into CSDC.
- Total 26 DC
Round 3
- Start next Round with CSDC into CSDC of R2 + DC in the same ST, make DC in next ST.
- (Make 2 DC in next ST, DC in next ST) – repeat until the end of the round.
- Join with SLST into CSDC.
- Total 39 DC.
Round 4
- Start next Round with CSDC into CSDC of R3 + DC in the same ST, make DC in next 2 ST.
- (Make 2 DC in next ST, DC in next 2 ST) – repeat until the end of the round.
- Join with SLST into CSDC.
- Total 52 DC
Round 5
- Start next Round with CSDC of R4 + DC in the same ST, make DC in next 3 ST.
- (Make 2 DC in next ST, DC in next 3 ST) – repeat until the end of the round.
- Join with SLST into CSDC.
- Total 65 DC.
Round 6
- Start next Round with CSDC into CSDC of R5 + DC in the same ST, make DC in next 4 ST.
- (Make 2 DC in next ST, DC in next 4 ST) – repeat until the end of the round.
- Join with SLST into CSDC.
- Total 78 DC.
Round 7
- Start next Round with CSDC into CSDC of R5 + DC in the same ST, make DC in next 4 ST.
- (Make 2 DC in next ST, DC in next 4 ST) – repeat until the end of the round.
- Join with SLST into CSDC.
- Total 78 DC
Round 8
- Start next Round with CSDC into CSDC of R7 + DC in the same ST, make DC in next 6 ST.
- (Make 2 DC in next ST, DC in next 6 ST) – repeat until the end of the round.
- Join with SLST into CSDC.
- Total 104 DC.
Round 9
- Start next Round with CSDC into CSDC of R8 + DC in the same ST, make DC in next 7 ST.
- (Make 2 DC in next ST, DC in next 7 ST) – repeat until the end of the round.
- Join with SLST into CSDC.
- Total 117 DC
Round 10
- Start next Round with CSDC into CSDC of R9 + DC in the same ST, make DC in next 8 ST.
- (Make 2 DC in next ST, DC in next 8 ST) – repeat until the end of the round.
- Join with SLST into CSDC.
- Total 130 DC
Round 11
- Start next Round with CSDC into CSDC of R10 + DC in the same ST, make DC in next 9 ST.
- (Make 2 DC in next ST, DC in next 9 ST) – repeat until the end of the round.
- Join with SLST into CSDC.
- Total 143 DC
Round 12
- Start next Round with CSDC into CSDC of R11 + DC in the same ST, make DC in next 10 ST.
- (Make 2 DC in next ST, DC in next 10 ST) – repeat until the end of the round.
- Join with SLST into CSDC.
- Total 166 DC
Part 2 – Crochet mandala for the front of the crochet hot pot stand
Round 1
- Colour A
- Make MR.
- Ch3 (counts as DC), make 12 DC in MR, tighten the ring.
- Cut the yarn. Make invisible join and hide yarn tail.
- Total: DC x 13 = 13 ST
Round 2
- Colour B
- Join yarn with standing DC in any ST of R1, Ch1.
- (DC in next ST, Ch1) – repeat until the end of the round.
- Cut the yarn. Make invisible join and hide yarn tail.
- Total: DC x 13, Ch1 x 13 = 26 ST
Round 3
- Colour C
- Join yarn with standing 2DCtog in any Ch1 SP of R1 + Ch1 + 2DCtog in the same Ch1 SP.
- (Skip DC of R1, 2DCtog + Ch1 + 2DCtog in next Ch1 SP) – repeat until the end of the round.
- Cut the yarn. Make invisible join and hide yarn tail.
- Total: 2DCtog x 26, Ch1 x 13 = 39 ST
Round 4
- Colour D
- Join yarn with standing DC in any Ch1 SP + 3 DC in the same Ch1 SP.
- (Skip 2 2DCtog, 4 DC in next Ch1 SP) – repeat until the end of the round.
- Cut the yarn. Make invisible join and hide yarn tail.
- Total: DC x 52 = 52 ST
Round 5
- Colour E
- Join yarn with standing HDC in 1st DC out of 4, HDC in next ST, Ch1, HDC in next 2 ST.
- (HDC in next 2 ST, Ch1, HDC in next 2 ST) – repeat until the end of the round.
- Cut the yarn. Make invisible join and hide yarn tail.
- Total: HDC x 52, Ch1 x 13 = 65 ST
Round 6
- Colour A
- Join yarn with standing SC into 3rd loop in the 1st HDC of R5, DC in next 3rd loop, DC in Ch1 SP, DC in next 3rd loop, SC in next 3rd loop, Spike SC between DC’s of R4.
- (SC in next 3rd loop, DC in next 3rd loop, DC in Ch1 SP, DC in next 3rd loop, SC in next 3rd loop, Spike SC between DC’s of R4) – repeat until the end of the round.
- Cut the yarn. Make invisible join and hide yarn tail.
- Total: DC x 39, SC x 26, Spike SC x 13 = 78 ST
Round 7
- Colour B
- Join yarn with standing Bobble ST in any Spike SC, Ch2, skip 2 ST, make 2 BPSC ar. next DC, Ch2.
- (Skip 2 ST, make Bobble ST in next Spike SC, Ch2, skip 2 ST, make 2 BPSC ar. next DC, Ch2) – repeat until the end of the round.
- Cut the yarn. Make invisible join and hide yarn tail.
- Total : Bobble ST x 13, Ch2 x 26, BPSC x 26 = 91 ST
Round 8
- Colour C
- Join yarn with standing DC into any 1st BPSC of R7 + 2 DC in the same ST, make Picot ST, 3 DC in next BPSC of R7, FPSC ar. Bobble ST.
- (Skip Ch2 SP, 3 DC into 1st BPSC out of 2, make Picot ST, 3 DC in next BPSC, FPSC ar. Bobble ST ) – repeat until the end of the round.
- Cut the yarn. Make invisible join and hide yarn tail.
- Total: DC x 78, Picot ST x 13, FPSC x 13 = 104 ST
Round 9
- Colour D
- Join yarn with standing SC in any Picot ST + SC in the same Picot ST, BPDC ar. next ST, BPTR ar. next 2 ST, BPDTR ar. BPSC of R8, BPTR ar. next 2 ST, BPDC ar. next ST.
- (2 SC in Picot ST, BPDC ar. next ST, BPTR ar. next 2 ST, BPDTR ar. BPSC of R8, BPTR ar. next 2 ST, BPDC ar. next ST) – repeat until the end of the round.
- Cut the yarn. Make invisible join and hide yarn tail.
- Total: SC x 26, BPDC x 26, BPTR x 52, BPDTR x 13 = 117 ST
Round 10
- Colour E
- Join with standing BPTR around 1st BPDC (just after 2 SC of R9), crochet BPTR ar. next 6 ST, 2TRtog in 1st SC of R9, Ch1, 2TRtog in 2nd SC of R9.
- (BPTR ar. next 7 ST, 2TRtog in 1st SC of R9, Ch1, 2TRtog in 2nd SC of R9) – repeat until the end of the round.
- Cut the yarn. Make invisible join and hide yarn tail.
- Total: BPTR x 91, 2TRtog x 26, Ch1 x 13 = 130 ST
Round 11
- Colour A
- Join with standing BPTR around 1st BPTR of R10, BPTR ar. next 6 ST, FPTR ar. 2TRtog, 2 2TRtog in next Ch1 SP, FPTR ar. 2TRtog of R10.
- (BPTR ar. next 7 ST, FPTR ar. 2TRtog, 2 2TRtog in next Ch1 SP, FPTR ar. 2TRtog of R10) – repeat until the end of the round.
- Cut the yarn. Make invisible join and hide yarn tail.
- Total: BPTR x 91, FPTR x 26, 2TRtog x 26 = 143 ST
Round 12
- Colour B
- Join with standing DC into any 2nd 2TRtog, crochet DC in next 4 ST, 2 DC in next ST, DC in next 5 ST.
- (DC in next 5 ST, 2 DC in next ST, DC in next 5 ST) – repeat until the end of the round.
- Cut the yarn. Make invisible join and hide yarn tail.
- Total: DC x 166 = 166 ST
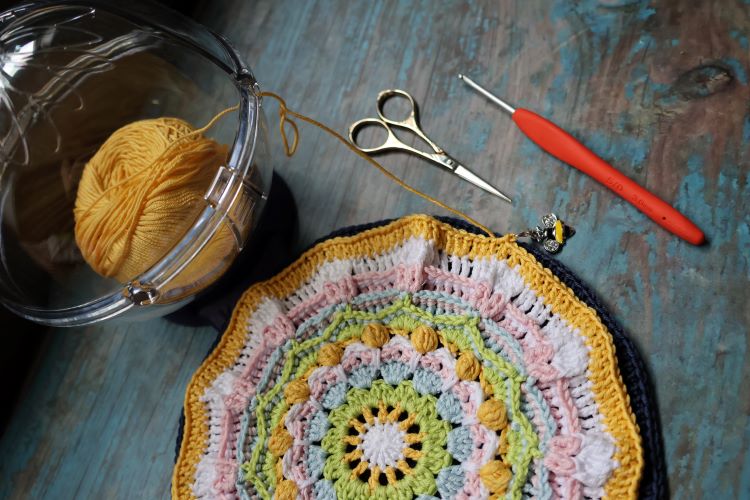
When both circles are ready you can block them so they will be the same size. After that you need to put Mandala circle on top of Plain circle wrong sides facing each other. Start attaching them with Colour C – make a standing HDC joining together both circles at a time through both loops. Continue with HDC until the end of the round. Cut the yarn. Make invisible join and hide yarn tail.
Your hot pot stand is ready!
Crochet Hot Pot Stand “Buff Beauty” PDF Pattern
If you want to get printable PDF pattern with detailed instructions and pictures for each round, it can be purchased from one of our stores:
Conclusion
Congratulations on finishing your crochet hot pot stand! Not only have you created a practical and stylish kitchen accessory, but you’ve also added a personal touch to your home decor. Whether you chose bold colors or kept it simple and classic, your handmade piece is sure to protect your surfaces while adding charm to your space. Don’t forget, these hot pot stands make wonderful gifts too! Now that you’ve mastered this project, feel free to experiment with different yarns, stitches, or even sizes to create a variety of unique stands. Keep exploring new free patterns on our site to expand your crochet repertoire. Happy crocheting!