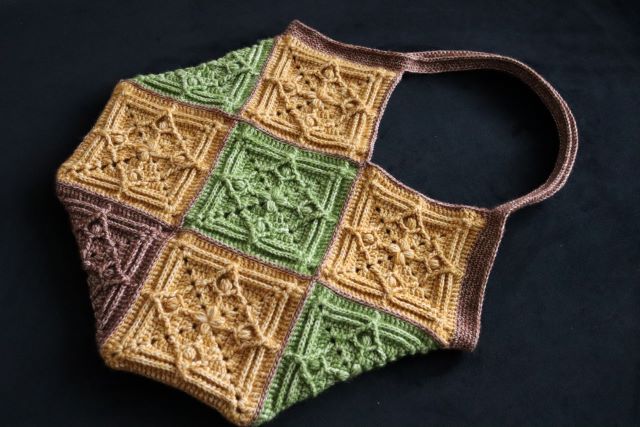
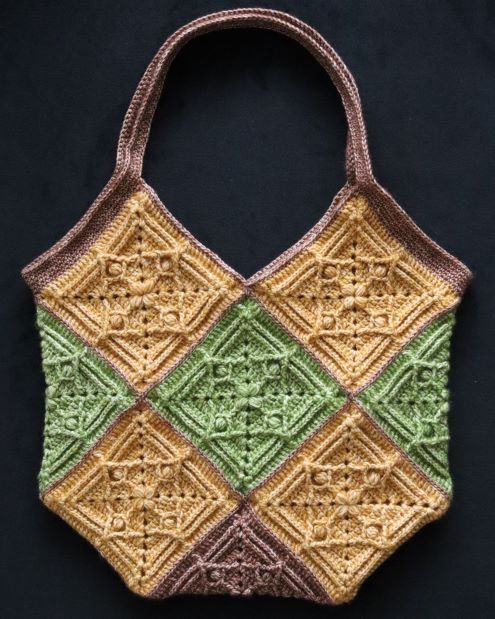
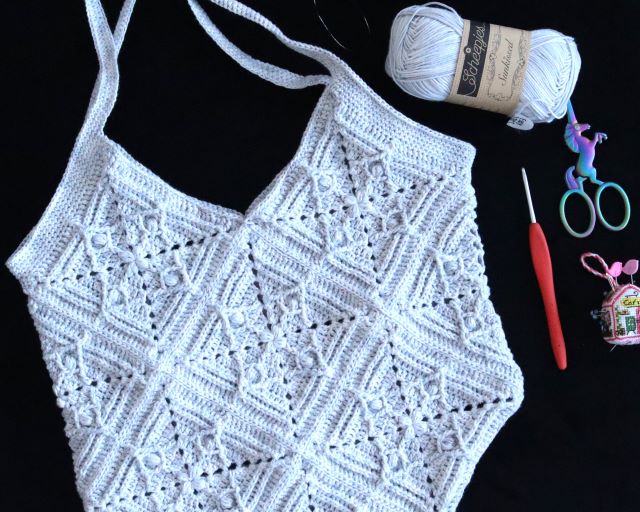
The Polar Fire Crochet Tote Bag, with its eye-catching design inspired by the flickering flames against the serene backdrop of polar nights, is more than just a bag—it’s a statement. The pattern uses granny squares as building block, which opens endless possibilities for customization. You can consider our other free pattern – Dandelion Granny Square as a building block. Crafted for crocheters of all skill levels, this pattern provides a delightful experience in creating a versatile accessory that stands out in both form and function.
Materials you will need for Crochet Tote Bag
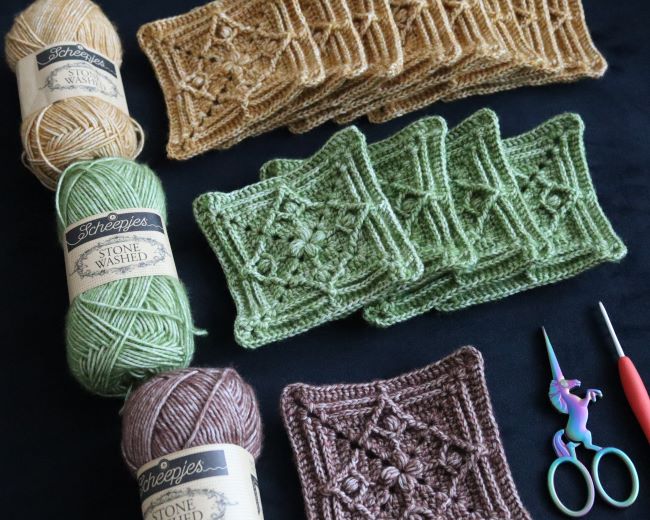
- Crochet hook 3mm
- Scheepjes “Stone Washed” (78% Cotton, 22% Acrylic), 50g = 130m
- Embroidery needle
- Scissors
Check all recommended yarn for all our patterns in this article.
Abbreviations (US Terms)
- MR – magic ring
- SLST – slip stitch
- Unf. – unfinished
- ST – stitch
- Ch – chain
- SP – space
- HDC – half double crochet
- SC – single crochet
- DC – double crochet
- FPDC – front post double crochet
- BPDC – back post double crochet
- FPDTR – front post double treble crochet
- FPTR – front post treble crochet
- 3FPDCtog – crochet 3 front post double crochet together
- Puff ST – Yarn over and insert your hook into the specified stitch/space. Yarn over again and pull up a long loop. (Yarn over and insert your hook into the same stitch/space. Yarn over again and pull up a long loop) three more times. Yarn over and pull through all 9 loops on your hook, Ch1
- Cluster – 2FPTRtog or 2FPDTRtog
Granny Squares
You will need 13 squares:
- 8 of Yellow Jasper colour
- 4 of Canada Jade colour
- 1 of Brown Agate colour
29 ST per side + Ch2 on corners
Round 1
Make MR. Ch 5 (counts as DC + Ch2), DC in MR, make Puff ST in MR, DC in MR, Ch2, DC in MR, Puff ST in MR, DC in MR, Ch2, DC in MR, Puff ST in MR, DC in MR, Ch2, DC in MR, Puff ST in MR.Join with SLST into 3rd Ch of initial ST.You should have 4 corners = (DC+Ch2+DC) + 4 Puff ST.
Round 2
SLST to Ch2, Ch5 (counts as DC + Ch2), 2 DC in the same Ch2 SP.
(DC in next ST (hidden ST),
FPDC around Puff ST, DC in next ST,
2 DC + Ch2 + 2 DC in the corner) – repeat till the last corner, where you will make 1 DC in Ch2 SP before the initial ST and join them with SLST into 3rd Ch.
Round 3
SLST to Ch2 SP, Ch5 (counts as DC + Ch2),
2 DC in the same Ch2 SP.
(DC in next 3 ST, FPDC around FPDC,
DC in next 3 ST, 2 DC + Ch2 + 2 DC in the corner) – repeat till the last corner, where you will make 1 DC in Ch2 SP before the initial ST and join them with SLST into 3rd Ch.
Round 4
SLST to Ch2 SP, Ch5 (counts as DC + Ch2),
2 DC in the same Ch2 SP.
(DC in next 2 ST, make unf. DC in next ST +
unf. FPTR around the 1st DC out of 2 in corner of R3 (after Ch2) + unf. FPTR around FPDC of R3 = crochet together, DC in next 2 ST,
Puff ST into FPDC of R3, DC in next 2 ST,
unf. DC in next ST + unf. FPTR around the same FPDC of R3 + unf. FPTR around 2nd DC out of 2 in the corner before Ch2 of R3 = crochet together, DC in next 2 ST, 2 DC + Ch2 + 2 DC in the corner) – repeat till the last corner,
where you will make 1 DC in Ch2 SP before the initial ST and join them with SLST into 3rd Ch.
Round 5
SLST to Ch2 SP, Ch5 (counts as DC + Ch2),
2 DC in the same Ch2 SP.
(Make DC in next 7 ST, FPDC ar. Puff ST of R4, make DC in next 7 ST,
2 DC + Ch2 + 2 DC in the corner) – repeat till the last corner,
where you will make 1 DC in Ch2 SP before the initial ST and join them with SLST into 3rd Ch.
Round 6
SLST to Ch2 SP, Ch5 (counts as DC + Ch2),
2 DC in the same Ch2 SP.
(BPDC around next 11 ST, FPDC around 2FPDTRtog, BPDC around next 11 ST,
2 DC + Ch2 + 2 DC in the corner) – repeat till the last corner, where you will make 1 DC in Ch2 SP before the initial ST and join them with SLST into 3rd Ch.
Round 7
SLST to Ch2 SP, Ch5 (counts as DC + Ch2),
2 DC in the same Ch2 SP.
(BPDC around next 11 ST, FPDC around 2FPDTRtog, BPDC around next 11 ST,
2 DC + Ch2 + 2 DC in the corner) – repeat till the last corner, where you will make 1 DC in Ch2 SP before the initial ST and join them with SLST into 3rd Ch.
Round 8
SLST to Ch2 SP, Ch5 (counts as DC + Ch2),2 DC in the same Ch2 SP.(FPDC around next 12 ST, 3FPDCtog,FPDC around next 12 ST,2 DC + Ch2 + 2 DC in the corner) – repeat till the last corner, where you will make 1 DC in Ch2 SP before the initial ST and join them with SLST into 3rd Ch.
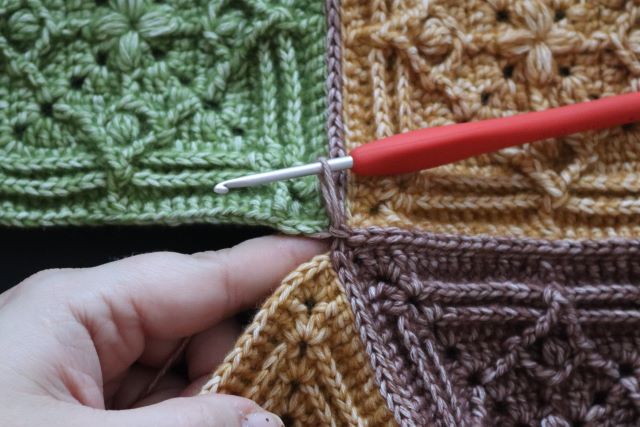
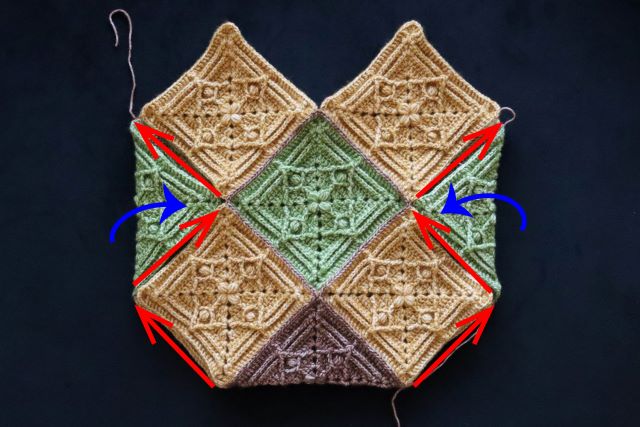
Joining the squares
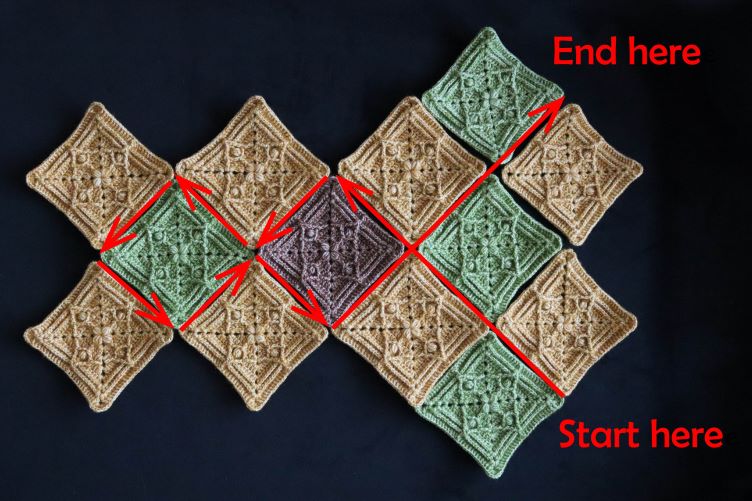
Lay squares out in rows according to the picture. Join them in the direction shown by red arrows using the flat slip stitch join.
Join the squares with right side facing up.
Make sure the working yarn is always at the back of the work and make your SLST loosely.
NOTE! To join the squares using the flat slip stitch join, you will place the squares side by side, instead of on top of each other, right side up.
Start with a slip knot on your hook. When you place the squares side by side, the v’s formed by the stitches of the last round of each square will be parallel to each other.
The 2 front loops will be farthest away from each other (so on the outside of the join). The 2 back loops will be right next to each other, so on the inside of the join = inside loops. You will be working ONLY into the inside loops (back loops).
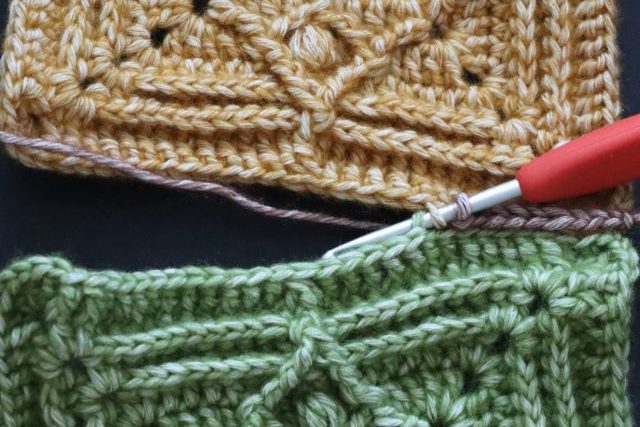
NOTE! Your squares have 2 chains at the corner, pick the chain stitch just before your first front double crochet stitch on the edge that you are going to join on your right. Insert the hook into the same back-loop corner stitch from front to back. Insert the hook into the back loop of the corner stitch of the second square, from front to back too. The working yarn under your squares. Yarn over and make a SLST.
Insert your hook from front to back into the inside loop of the next stitch of the square on your right. Then insert your hook from front to back into the inside loop of the next stitch of the other square, grab your yarn, which will be at the back of your work, and make a SLST. Do not make it too tight as it must be a little bit loose.
When you come to the joined squares, work the Ch1 over the top of a join already made, keeping the yarn at the back of the work.
Now you need to fold the body of the bag in half and fold the side squares in half. The right side should be facing. Continue joining with the same method. Start from the bottom.
Straps
Remember that you can adjust the number of chains needed for the straps if you want a different length.
Round 1
Start with attaching your yarn in the first corner space of the joined squares at the side of the bag, Ch1 (doesn’t count as a ST), make 3SCtog across 3 corner spaces (Ch2 SP), (SC in next 29 ST,
SC + Ch2 + SC in the corner space,
SC in the next 29 ST, 3SCtog across
the next 3 corner spaces) – repeat around till the first 3SCtog and join with SLST.
Round 2
Ch1 and make SC in the same ST, make SC in next 29 ST, SC into Ch2 SP, Ch90,
SC into next Ch2 corner SP, SC into next 61 ST, make SC into Ch2 SP, Ch90 and make SC into next Ch2 corner SP, make SC in next 30 ST, join with SLST into 1st SC.
Round 3
Ch1 and make SC in the same ST, make SC in next 30 ST, now you need to make SC in next 90 chains, make SC into next 63 ST, make SC in next 90 chains, SC in next 31 ST,join with SLST into 1st SC.
Round 4 and until the strap will be thick enough for you
Ch1 (doesn’t count as ST), make SC in each ST around, join with SLST to the 1st SC.
Fasten of and hide the yarn tail.
All done!
Video Tutorial
If you find more insides on how to make the crochet tote bag – feel free to refer to our video tutorial on YouTube.
Crochet Tote Bag “Polar Fire” PDF Pattern
If you want to get printable PDF pattern with instructions and pictures for each round, it can be purchased from one of our stores:
Conclusion
As we wrap up our exploration of the Polar Fire Tote Bag crochet pattern, we hope you’re as excited as we are to embark on this creative journey. This pattern not only offers a unique opportunity to craft a beautiful and practical accessory but also allows you to weave a bit of magic into every stitch, creating something truly personal and special. Whether you’re making it for yourself or as a thoughtful gift for someone dear, the Polar Fire crochet Tote Bag is bound to be a cherished item for years to come. Happy crocheting, and may your crafting adventures continue to bring warmth and beauty into your life. Don’t forget to check our other free patterns – happy crocheting!