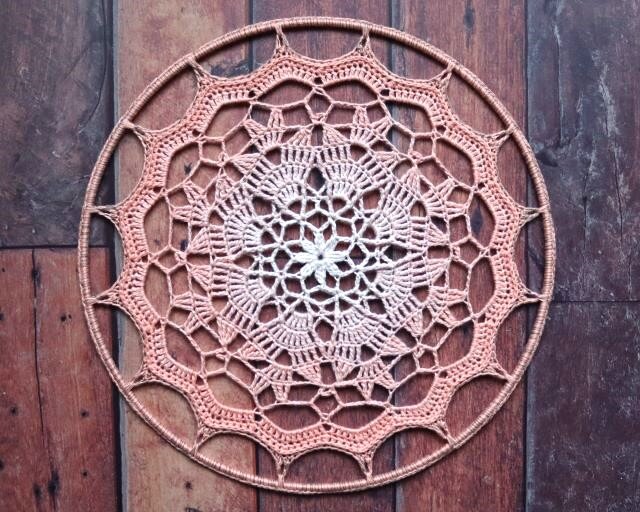
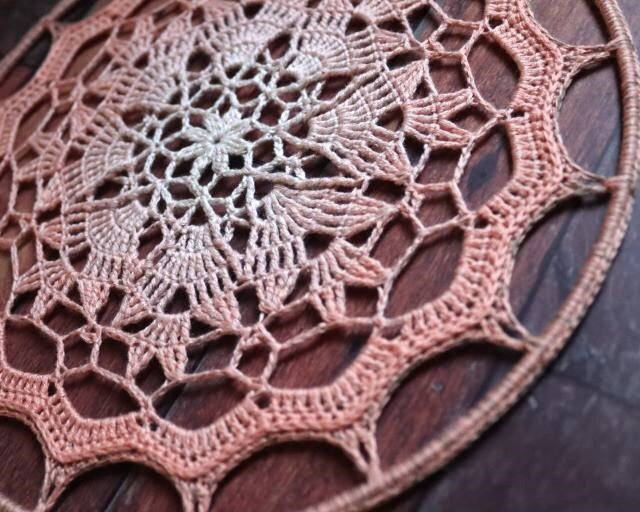
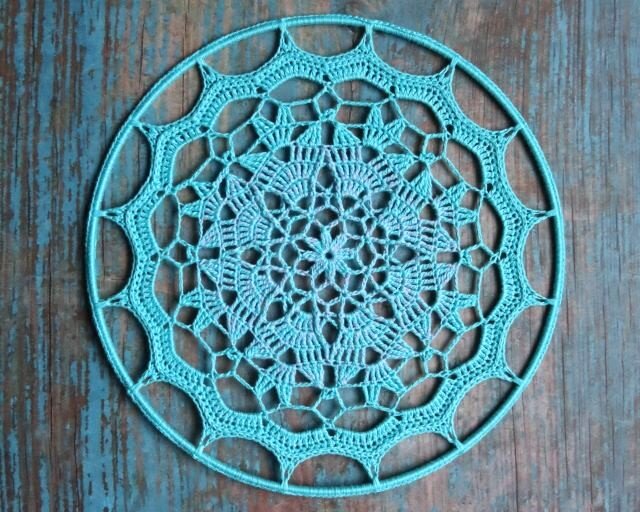
Crocheting is a wonderfully versatile and therapeutic craft that allows you to turn simple yarn into intricate and beautiful creations. One of the most mesmerizing crochet projects you can tackle is the mandala. Mandalas as a doily are circular patterns that radiate out from the center, often featuring intricate designs and vibrant colors. They are not only a joy to create but also serve as eye-catching decorations or thoughtful gifts. In this article, we’ll explore a free crochet mandala pattern with detailed instructions that you can follow to make your very own stunning mandala. Don’t forget to check our free patterns, including mandala “Pineapple Lilly” .
Materials You’ll Need
Before we dive into the pattern itself, gather the following materials. Please note that this what we used for the pattern, you may choose different yarn and hoop – please see some considerations below.
- 20-25gr of 4ply 100% cotton yarn, 200g=800m, 2(fine)
- 1.75mm hook
- 25cm hoop (or bigger if your crochet is loose or you will take a bigger hook)
Choosing Yarn for Crochet Mandala
Selecting the right yarn for your crochet mandala project is a crucial step that can significantly impact the final result. The choice of yarn determines the texture, appearance, and overall feel of your mandala. Here are some considerations to help you make an informed decision:
Yarn Weight
Yarn comes in various weights, ranging from lace weight (super fine) to super bulky. When choosing a yarn weight for your mandala, consider the final size and purpose of your project. For a small, delicate mandala, lace or fingering weight yarn can be a great choice. On the other hand, worsted weight yarn is commonly used for medium-sized mandalas, while bulky or super bulky yarn can create larger and thicker mandalas suitable for home decor pieces like table runners or wall hangings.
Fiber Content
Yarns are available in a wide range of fiber compositions, including acrylic, cotton, wool, bamboo, silk, and more. Each type of fiber has its unique characteristics. Acrylic yarns are affordable, durable, and come in a vast array of colors, making them a popular choice for beginners. Cotton yarns are ideal for items that need to be washable and have a crisp finish, while wool provides warmth and softness, making it great for cozy home accessories.
Texture
Consider the texture of the yarn, which can add depth and dimension to your crochet mandala. Smooth yarns create a clean and polished look, while textured or bouclé yarns can add a playful and tactile element to your project. You can experiment with different textures to achieve the desired visual and sensory effect.
Color Selection
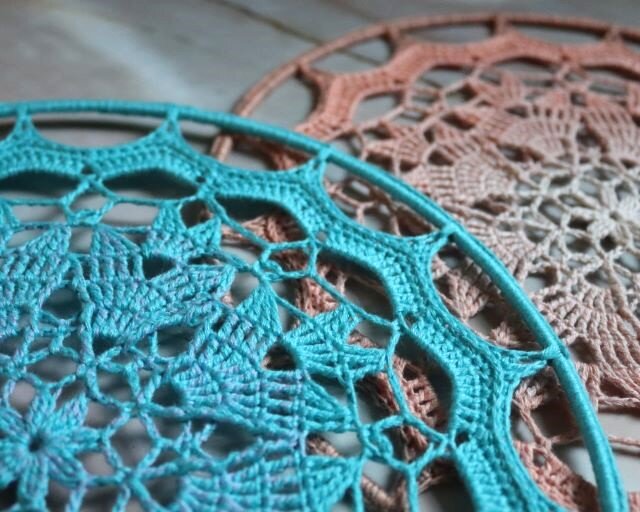
Mandalas are known for their intricate designs and vibrant colors. The color palette you choose can significantly impact the visual appeal of your mandala. Traditional mandalas often incorporate bright, contrasting colors to highlight the details of the pattern. However, you can also opt for a more muted or monochromatic scheme for a subtle and elegant look. Consider gradient yarn allowing change of the color of your work.
Budget
Yarn prices can vary widely depending on the fiber content and brand. It’s essential to consider your budget when selecting yarn for your crochet mandala project. There are high-quality yarns available in various price ranges, so you can find a suitable option that fits your budget without compromising on the final result.
Availability
Check the availability of the yarn you choose in your local yarn store or online. It can be frustrating to start a project only to realize that you can’t find enough of the same yarn to complete it. Make sure to purchase enough yarn for your entire project to ensure consistent color and texture.
Selecting the right yarn for your crochet mandala is a creative and practical decision. Consider factors such as yarn weight, fiber content, texture, color, budget, availability, and personal preference to choose the perfect yarn that will bring your mandala to life. Whether you opt for a classic combination or decide to experiment with unique fibers and textures, your choice of yarn will play a vital role in the overall success and beauty of your crochet project.
Choosing hoop for your mandala
Choosing the right hoop size for your crochet mandala is an important decision that directly impacts the final appearance and functionality of your project. Hoops, also known as frames or rings, are used to frame and display your crochet mandala, turning it into a stunning piece of wall art, a dreamcatcher, or even a decorative table centerpiece. Here are some considerations to help you select the ideal hoop size for your crochet mandala.
Considerations
- Mandala Diameter: The primary factor to consider when choosing a hoop size is the diameter of your crochet mandala. The hoop should be large enough to comfortably accommodate the entire mandala without distorting or compressing it. It’s crucial to measure the completed mandala before selecting a hoop to ensure a proper fit.
- Desired Visual Impact: The size of the hoop can significantly affect the visual impact of your crochet mandala. A smaller hoop will frame the mandala neatly, creating a delicate and intimate display. On the other hand, a larger hoop can make a bold and striking statement, turning your mandala into a focal point in your decor. Consider the overall aesthetic you want to achieve and how the hoop size contributes to it.
- Mandala Detail: The level of detail in your mandala’s design can also influence your hoop size choice. If your mandala features intricate patterns and fine details, a larger hoop can help showcase these elements more effectively. Conversely, if your mandala has a more straightforward design, a smaller hoop may be sufficient.
- Functionality: Think about how you intend to use your crochet mandala. If you plan to hang it on the wall, consider the available wall space and the size of the surrounding decor. Smaller mandalas with smaller hoops can be versatile and fit well in tight spaces. If you’re creating a dreamcatcher or a table centerpiece, the hoop size should complement the intended purpose and setting. Check out our take on differences between mandala and doily in our article: Crafting Elegance: The Art and History of the Crochet Doily.
- Hanging Mechanism: Consider how you plan to hang your crochet mandala. Some hoops come with built-in hooks or hardware for easy wall mounting, while others require additional accessories. Ensure that the chosen hoop size accommodates your preferred hanging method and provides adequate support.
Abbreviations (US Terms)
- MR – magic ring
- SLST – slip stitch
- Unf. – unfinished
- St – stitch
- Ch – chain
- SP – space
- HDC – half double crochet
- SC – single crochet
- DC – double crochet
- TR – treble crochet
- 2HDCtog – crochet 2 half double crochets together
- 3TRtog – 3 TR crochet together
- FPTR – front post treble crochet
- 2FPTRtog – 2 unf. front post treble crochet together
- 4FPTRtog – 4 unf. front post treble crochet together
Check out our quick guide on crochet stitches: Crochet Basics: A Guide to Fundamental Stitches (US Terms).
Mandala Crochet Pattern
Round 1
Make MR. Ch4 (counts as TR) + next 2 unf.TR crochet together, Ch5.
(3TRtog, Ch5) – repeat till you will have 8 arches.
Join with SLST into top of 1st 3TRtog.
Round 2
SLST to 3rd Ch out of Ch5 SP, Ch1 + SC in the same Ch5 SP, Ch6.
(SC in next Ch5 SP, Ch6) – repeat till the end.
Join with SLST into 1st SC.
Round 3
Ch6 (counts as TR + Ch3) + TR in the same ST, Ch1, DC in Ch6 SP, Ch1.
(TR + Ch3 + TR in next SC of R2, Ch1, DC in Ch6 SP, Ch1) – repeat till the end.
Join with SLST into 3rd Ch of init. ST.
Round 4
SLST to Ch 3 SP, Ch3 (counts as TR), make 3 TR in the same Ch3 SP, FPTR ar. TR of R3, Ch3, SLST into DC of R3, Ch3, FPTR ar. TR of R3.
(4 TR in Ch3 SP, FPTR ar. TR of R3, Ch3, SLST into DC of R3, Ch3, FPTR ar. TR of R3) – repeat till the end.
Join with SLST into 3rd Ch of init. ST.
Round 5
Ch3 (counts as TR) + TR in the same ST, make 2 TR in next 3 ST, FPTR ar. FPTR, Ch1, FPTR ar. FPTR.
(2 TR in next 4 ST, FPTR ar. FPTR, Ch1, FPTR ar. FPTR) – repeat till the end.
Join with SLST into 3rd Ch of init. ST.
Round 6
Ch3 (counts as TR), TR in next 3 ST, Ch3, TR in next 4 ST, 2FPTRtog (using FPTR’s of R5).
[TR in next 4 ST, Ch3, TR in next 4 ST, 2FPTRtog (using FPTR’s of R5)] – repeat till the end.
Join with SLST into 3rd Ch of init. ST.
Round 7
Ch3 + 3 next unf. TR crochet together = 1st 4TRtog, Ch3, 5 TR in Ch3 SP, Ch3, 4TRtog, Ch2.
(Skip 2FPTRtog, crochet 4TRtog, Ch3, 5 TR in Ch3 SP, Ch3, 4TRtog, Ch2) – repeat till the end.
Join with SLST into top of 1st 4TRtog.
Round 8
SLST to 1st TR of R7, Ch2 + next 2 unf. TR crochet together = 1st 3TRtog, Ch5, crochet next 3TRtog (1st TR will go into the same ST as the 3rd TR of your 1st 3TRtog and next 2 in next 2 ST), Ch6, crochet SC + Ch3 + SC in Ch2 SP between 2 4TRtog, Ch6.
(3TRtog, Ch5, crochet next 3TRtog (1st TR will go into the same ST as the 3rd TR of your 1st 3TRtog and next 2 in next 2 ST), Ch6, crochet SC + Ch3 + SC in Ch2 SP between 2 4TRtog, Ch6) – repeat till the end.
Join with SLST into top of 1st 3TRtog.
Round 9
SLST to 3rd Ch out of Ch5 SP, Ch1 + SC in the same Ch5 SP, Ch10, 2TRtog (Right leg into 1st Ch6 SP and Left leg into 2nd Ch6 SP), Ch10.
(SC in Ch5 SP, Ch10, 2TRtog (Right leg into 1st Ch6 SP and Left leg into 2nd Ch6 SP), Ch10) – repeat till the end.
Join with SLST into 1st SC.
Round 10
SLST to Ch10, Ch2 (counts as DC), make 11 DC in the same Ch10 SP.
(12 DC in next Ch10 SP) – repeat till the end.
Join with SLST into 2nd Ch of init. ST.
Round 11
Make SLST to next ST, Ch1 + HDC in the same ST, HDC in next 3 ST, 2 HDC in next ST, HDC in next 5 ST, 2HDCtog.
(HDC in next 4 ST, 2 HDC in next ST, HDC in next 5 ST, 2HDCtog) – repeat till the end.
Join with SLST leaving the working loop to the back of the work.
Round 12
All rounds in 3rd loop only!
Ch1 + SC in the same ST, make SC in next 4 ST, DC + Ch3 + DC in next ST, make SC in next 5 ST.
(Skip 2HDCtog, make SC in next 5 ST, DC + Ch3 + DC in next ST, make SC in next 5 ST) – repeat till the end.
Join with SLST into 1st HDC.
Cut the yarn. Close with invisible join and hide the tail.
Attaching to the hoop
Use some yarn pieces to attach your mandala to the hoop.
Now you will join mandala to the hoop with 2 SC into Ch3 SP and around the hoop.
Continue with 15 SC around the hoop till next Ch3 SP. Make 2 SC into Ch3 SP and around the hoop. Continue with 15 SC around the hoop till next Ch3 SP.
Feel free to add or take SC around the hoop if you need until they will hide the colour of the hoop. Repeat till the end.
Fasten off. Join with invisible stitch. Hide yarn tail.
All done!
Crocheting a mandala is a delightful and creative endeavor that can add a touch of handmade beauty to your life. Whether you’re a seasoned crocheter or just starting out, this free crochet mandala pattern provides an opportunity to explore new stitches and techniques while crafting a stunning piece of art. Experiment with different color combinations and sizes to make your mandala truly unique. Enjoy the meditative process of crocheting as you create a beautiful work of art that can be cherished for years to come. Happy crocheting!
Check our other free patterns here – Wizard of Loops Free Patterns.
Can you tell me exactly what yarn you used to accomplish the gradient peach mandala? You mention in the pattern that it is 20-25gr of 4ply 100% cotton yarn, 200g=800m, 2(fine). What does this mean? Did you buy a 200g ball and only use 25g of it?