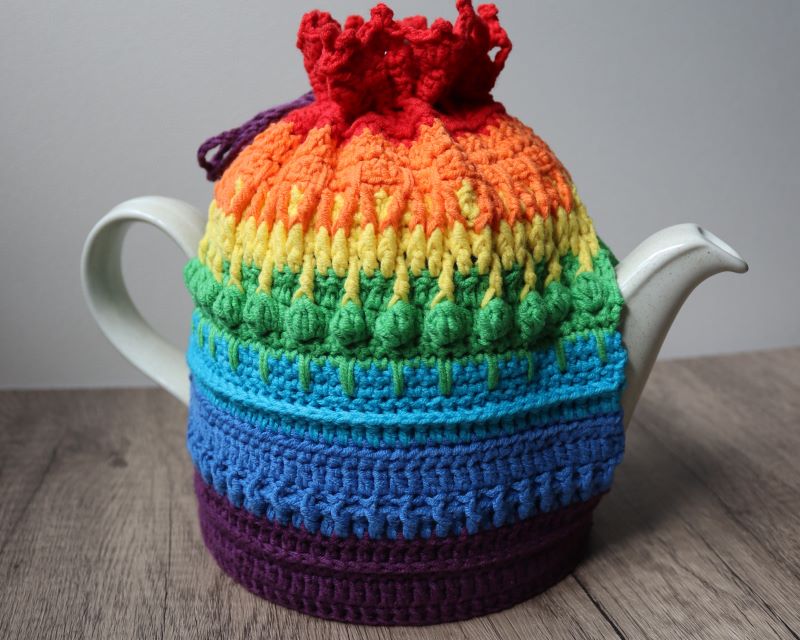
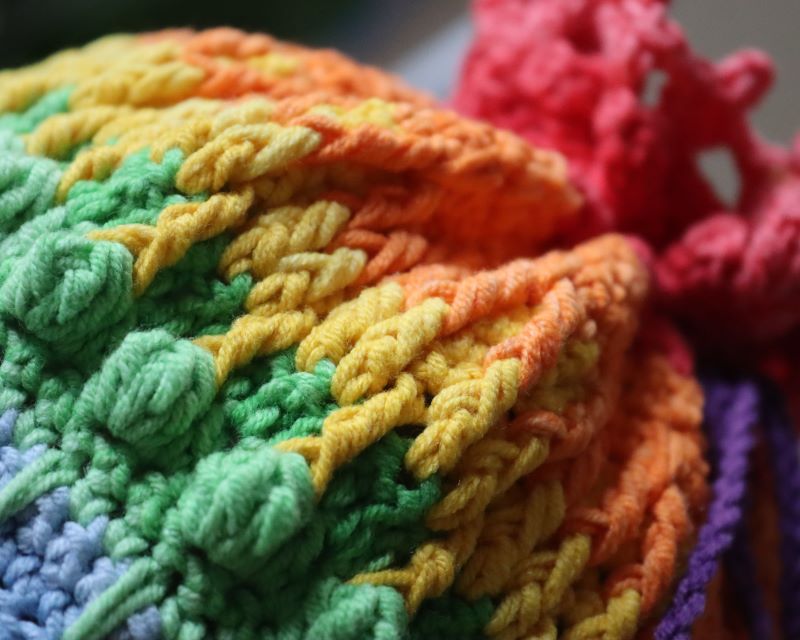
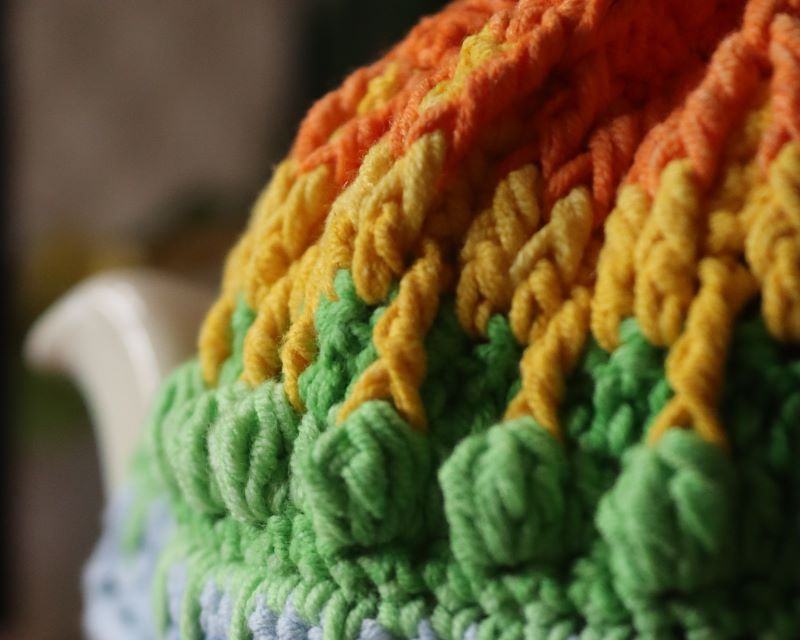
Introducing our charming Crochet Teapot Warmer, the perfect blend of function and style for any tea lover! Handcrafted with love, this delightful tea cozy ensures your tea stays piping hot while adding a touch of cozy elegance to your kitchen. Beyond its functional purpose, it adds a decorative touch to any tea service, making gatherings more inviting and aesthetically pleasing. Basic crochet skills are essential, so you’ll need to be comfortable with stitches like single crochet, double crochet, and some more challenging stitches. Treat yourself or gift it to a loved one, and add a handmade touch of warmth to every tea time!
Tools and Materials you will need to make Crochet Teapot Warmer
Colourway 1: Scheepjes Softfun
- A = Candy Apple (2410) x1 ball
- B = Tangerine (2427) x1 ball
- C = Canary (2518) x1 ball
- D = Emerald (2605) x1 ball
- E = Dark Turquoise (2511) x1 ball
- F = Azure (2629) x1 ball
- G = Heath (2493) x1 ball
Colourway 2: Scheepjes Softfun Denim
- A = 505 x1 ball
- B = 519 x1 ball
- C = 520 x1 ball
- D = 506 x1 ball
- E = 509 x1 ball
- F = 501 x1 ball
- G = 515 x1 ball
Tools:
- Crochet hook 3.5mm/E
- Scissors
- Tapestry needle
Measurements
- Teapot size is 2 1/2pt or 2,4 l.
- Base is 15cm and height is 18cm.
Abbreviations (US Terms)
- Init. – Initial
- MR – Magic ring
- Ch – Chain
- SP – Space
- SLST – Slip stitch
- ST – Stitch
- HDC – Half double crochet
- SC – Single crochet
- DC – Double crochet
- CSDC – Chainless starting double crochet
- Spike SC – Insert your hook into named Row and pull out a long loop level with current round and work SC as normal
- FPDC – Front post double crochet
- BPDC – Back post double crochet
- 5-DC Cluster – Crochet five half-closed double stitches. Pull the yarn back through all six loops on your hook.
- FPTR – Front post treble crochet
- 2FPTRtog – Crochet 2 front post treble crochets together
- Picot ST – Ch3 and then work a slip stitch in the first chain stitch you made.
- […] – Total number of stitches per round
Crochet Teapot Warmer Pattern
Start with colour A.
Round 1
- Make MR, crochet 6 SC in it. Tighten the ring.
- Join with SLST into 1st SC. [6 SC]
Round 2
- Start with CSDC + DC in the same ST
- (2DC in every ST) – repeat till the end
- Join with SLST into CSDC. [12 DC]
- Cut the yarn. Hide yarn tail.
Round 3
- Join colour B by making CSDC in any DC of R2, 2 DC in next ST.
- (DC in next, 2 DC in next ST) – repeat till the end of the round
- Join with SLST into CSDC. [18 DC]
- Cut the yarn. Hide yarn tail
Round 4
- Join colour C by making CSDC in any DC of R3, 2 DC in next ST.
- (DC in next, 2 DC in next ST) – repeat till the end of the round.
- Join with SLST into CSDC. [27 DC]
- Cut the yarn. Hide yarn tail.
Round 5
- Join colour D by making CSDC in any DC of R4, 2 DC in next ST.
- (DC in next, 2 DC in net ST) – repeat till the end of the round. DC in last ST.
- Join with SLST into CSDC. [40 DC]
- Cut the yarn. Hide yarn tail
Round 6
- Join colour E by making CSDC in any DC of R5, 2 DC in next ST.
- (DC in next, 2 DC in next ST) – repeat till the end of the round.
- Join with SLST into CSDC. [60 DC]
- Cut the yarn. Hide yarn tail.
Round 7
- Join colour F by making CSDC in any DC of R6.
- DC in every ST till the end of the round.
- Join with the SLST into CSDC. [60 DC]
- Cut the yarn. Hide yarn tail.
Round 8
- Join colour G by making CSDC in any DC of R7, DC in next 2 ST, 2 DC in next ST.
- (DC in next 3 ST, 2 DC in next ST) – repeat till the end of the round.
- Join with SLST into CSDC. [75 DC]
Round 9
- Make CSDC in 1st ST, 2 DC in next ST.
- (DC in next 4 ST, 2 DC in next ST) – repeat till last 3 ST.
- DC in last 3 ST.
- Join with SLST into CSDC. [90 DC]
Round 10
- Ch2, make BPDC ar. each ST till the end of this round.
- Join with SLST into 1st BPDC. [90 HDC]
- You have created an edge. From this point your work will grow up, leaving your base flat.
Round 11
- Ch2 (counts as DC), crochet DC in every ST of this round.
- Join with SLST into 2nd Ch of init. ST. [90 ST]
Round 12
- Make SLST in next 2 ST, Ch1 + HDC in next same ST, crochet HDC in next 85 ST.
- Now you will start to work on sides only!
- There will be Right Side (RS) – the side that you will see while using the warmer, and Wrong Side (WS) – this one stays unseen
Side A
Round 13
- Turn your work. You will work on WS.
- Make CSDC into FRONT LOOP, make DC in next 42 FRONT LOOPS only. [43 ST]
- Cut the yarn. Hide yarn tail.
Round 14
- Turn your work. You will work on RS.
- Join colour F by making CSDC in 1st ST of R13.
- DC in every ST till the end of the row. [43 DC]
Round 15
- Turn your work. You will work on WS.
- Make CSDC in the beginning of this row.
- (BPDC ar. next ST, FPDC ar. next ST) – repeat till last 2 ST. BPDC, crochet DC in last ST. [43 DC]
Round 16
- Turn your work. You will work on RS.
- Make CSDC in the beginning of this row.
- Crochet DC in every ST till the end. [43 ST]
Round 17
- Turn your work. You will work on WS.
- Make HDC in the beginning of this row.
- Crochet HDC in every ST till the end. [43 ST]
- Cut the yarn. Hide yarn tail.
Round 18
- Turn your work. You will work on RS.
- In this row you will crochet into Back loop + 3rd Loop, leaving Front loop unworked to the front of the work
- Join colour E by making CSDC into 1st ST.
- DC in every ST till the end of the row. [43 DC]
Round 19
- Turn your work. You will work on WS.
- Make CSDC in the beginning of this row.
- Crochet FPDC ar. every ST till last ST.
- Make DC in last ST. [43 ST]
Round 20
- Turn your work. You will work on RS.
- Make SC in the beginning of this row.
- Crochet SC in every ST till the end. [43 ST]
Round 21
- Turn your work. You will work on WS.
- Make SC in the beginning of this row.
- Crochet SC in every ST till the end. [43 ST]
- Cut the yarn. Hide yarn tail.
Round 22
- Turn your work. You will work on RS.
- Join colour D by making SC into 1st ST.
- [(Make Spike SC (insert your hook three rounds down into DC and pull out a long loop level with current round and work SC as normal) leaving a stitch behind it unworked, SC in next 2 ST] – repeat till the end of the row. [43 DC]
Round 23
- Turn your work. You will work on WS.
- Make SC in the beginning of this row.
- Crochet SC in every ST till the end. [43 ST]
Round 24
- Turn your work. You will work on RS.
- Make CSDC in the beginning of this row.
- (5-DC Cluster in next ST, DC in next 2 ST) x14. [43 ST]
Round 25
- Turn your work. You will work on WS.
- Make CSDC in the beginning of this row.
- Crochet DC in every ST till the end. [43 ST]
- Cut the yarn. Hide yarn tail.
Round 26
- Turn your work. You will work on RS.
- Join colour C by making CSDC into 1st ST.
- (FPTR ar. 5-DC Cluster leaving ST behind it unworked, DC in next 2 ST) x 14. [43 ST]
Round 27
- Turn your work. You will work on WS.
- Make SC in the beginning of this row.
- Crochet SC in every ST till the end. [43 ST]
Round 28
- Turn your work. You will work on RS.
- Make SC in the beginning of this row.
- (Make SC in next ST, FPDC ar. next 2 DC of R25) x13, SC in next ST, FPDC ar. next ST, SC in last ST. [43 ST]
Round 29
- Turn your work. You will work on WS.
- Make CSDC in the beginning of this row.
- Crochet DC in every ST till the end. [43 ST]
- Cut the yarn. Hide yarn tail.
Round 30
- Turn your work. You will work on RS.
- Join colour B by making CSDC into 1st ST.
- Make FPTR ar. FPDC of R28 (skip ST behind it), [SC in next 2 ST, 2FPTRtog (RIGHT leg.ar next FPDC of R28 and LEFT leg ar. next FPDC of R28)] x 13, SC in last 2 ST. [43 ST]
Round 31
- Crochet all row in 3rd loop only!
- Turn your work. You will work on WS.
- Make SC in the beginning of this row.
- Crochet SC in every ST till the end. [43 ST]
Round 32
- Turn your work. You will work on RS.
- Crochet SC into 1st ST.
- [Spike SC(insert your hook into skipped DC of R29, between 2FPTRtog and pull out a long loop level with current round and work SC as normal) + skip the ST behind it, SC in next 2 ST] x14. [43 ST]
Round 33
- Turn your work. You will work on WS.
- Make CSDC in the beginning of this row.
- Crochet DC in every ST till the end. [43 ST]
- Cut the yarn. Hide yarn tail.
Round 34
- Turn your work. You will work on RS.
- Join colour A by making HDC into 1st ST.
- Crochet HDC in every ST till the end. [43 ST]
Round 35
- Turn your work. You will work on WS/
- Crochet SC in every FRONT LOOP of every ST till the end of the row. [43 ST]
Round 36
- Turn your work. You will work on RS.
- Make CSDC in the beginning of this row.
- (Ch1, skip one ST, DC in next ST) x 21. [43 ST]
Round 37
- Turn your work. You will work on WS.
- Make HDC in the beginning of this row.
- (Make HDC in Ch1 SP, HDC in next ST) x 21. [43 ST]
Round 38
- Crochet all row in 3rd loop only!
- Turn your work. You will work on RS.
- Start with SC into 1st 3rd loop, SC in every 3rd loop till the end of this row. [43 ST]
Round 39
- Turn your work. You will work on WS.
- Make SC in the beginning of this row.
- Crochet SC in every ST till the end. [43 ST]
Round 40
- Turn your work. You will work on RS.
- Make CSDC in the beginning of this row, Ch1, skip 2 ST, 2 DC + Picot ST + 2 DC in next ST, Ch1.
- (Skip 4 ST, 2 DC + Picot ST + 2 DC in next ST, Ch1) x 7, skip 3 ST, DC in last ST.
- Total (2 DC + Picot ST + 2 DC in next ST) x 8
- Fasten off. Hide yarn tails
Side B
- Let’s start the other side of this teapot warmer.
- You will need to repeat Rows 13 – 40 starting from the WS in next ST
- Continue till the end. Fasten off. Hide yarn tails.
- When both sides are ready you will need to make a string so you could tie it on top.
- Chain 140, cut the yarn, tie a knot.
- Pull it through Row 36 in a zig-zag way on both sides leaving a space for a bow from the handle side.
- Your teapot warmer is ready!
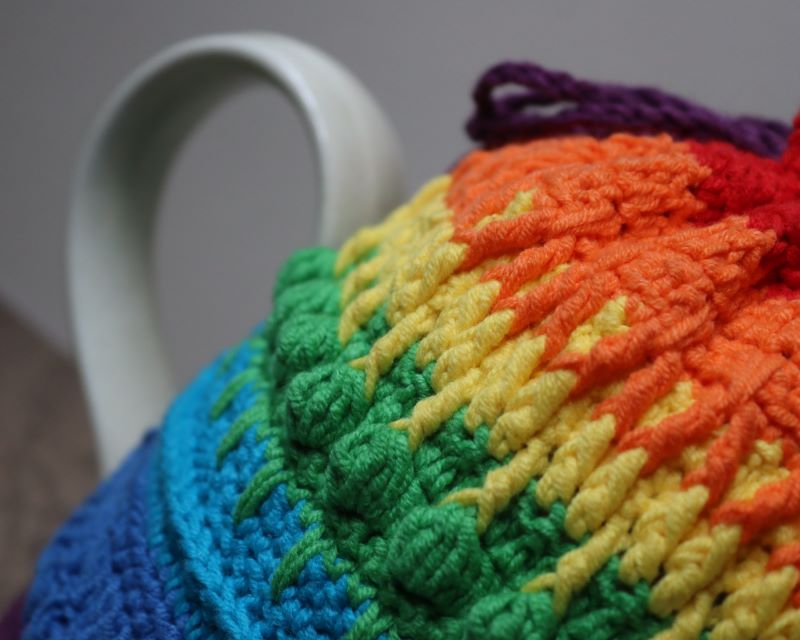
This is it, your crochet teapot warmer is ready!
Conclusion
Congratulations on completing your crochet teapot warmer! You’ve created a beautiful handmade piece that adds a touch of personal charm to your tea time. Every stitch represents your creativity and effort, making this teapot warmer a unique addition to your kitchen or a thoughtful, heartfelt gift. Enjoy the satisfaction of seeing your hard work in use and the cozy warmth it brings to every cup of tea. Whether for personal use or as a gift, your crochet teapot warmer is a testament to your skill and creativity.Keep exploring new free patterns on our site to expand your crochet repertoire. Happy crocheting!