*Please note that some links on this page are affiliate links, it will cost you nothing, but if you will purchase something using these links, we may receive small commission.
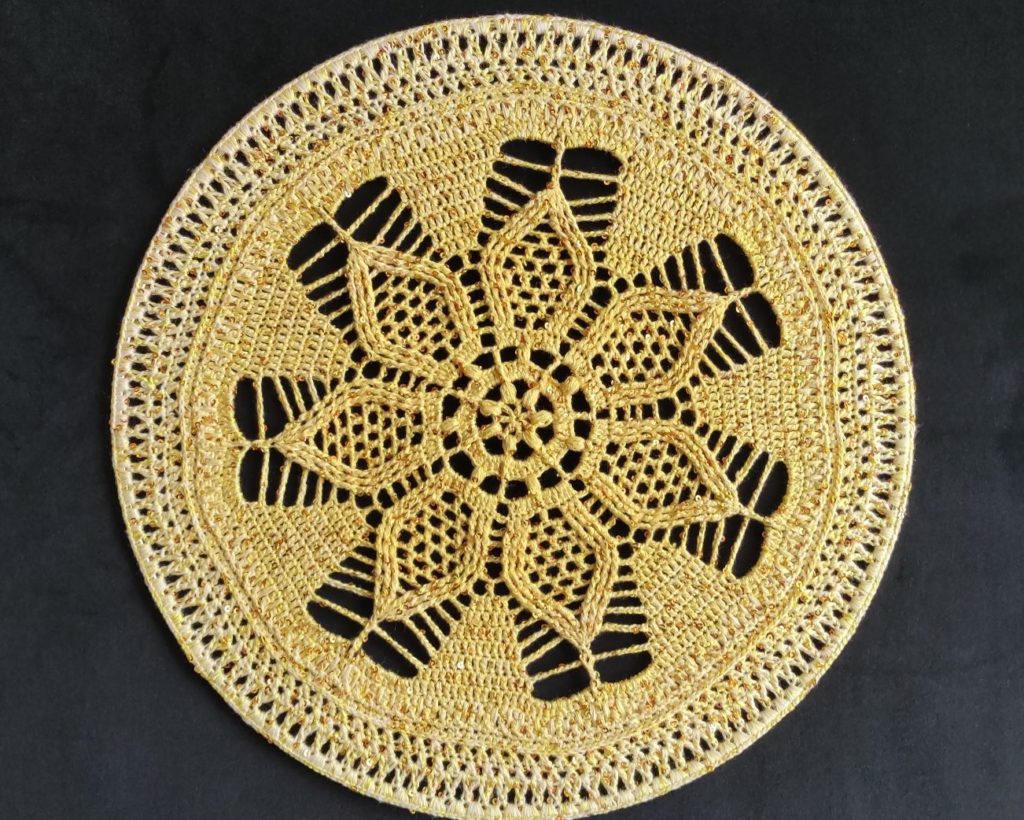
The Poinsettia Mandala, our featured free crochet pattern, embodies the spirit of the holiday season with its vibrant colors and intricate design, reminiscent of the festive poinsettia flower. This pattern is designed to inspire crocheters of all levels, from beginners looking for a new challenge to advanced crafters seeking a stunning addition to their collection of handmade decorations. In this article, we will delve into the inspiration behind the Poinsettia Mandala, provide step-by-step instructions to guide you through each part of the process, and offer tips to customize your mandala. You also can check video tutorial for the mandala creation on our YouTube channel.

Materials you will need
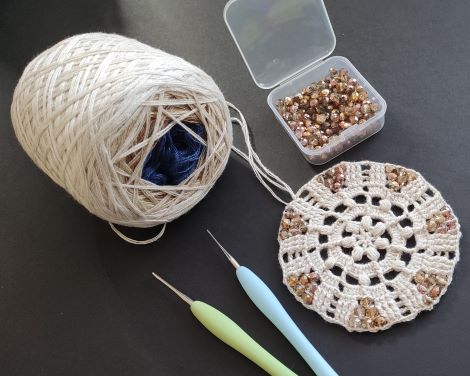
To make this free mandala crochet pattern, gather the following materials. Please note that this what we used for the pattern, you may choose different yarn and hoop – please see some considerations below:
- ~35-40gr of 3ply 50/50 acrylic/cotton yarn (or bigger ball), 100g=500m. You can try following yarns:
- 1.75mm hook and a smaller hook for crystals (make sure that it can go through the crystal with yarn before you start your mandala
- Hoop 12″ (30cm) or bigger if your crochet is loose or you will take a bigger hook
- Crystals (around 150pc with 2mm inner hole) / any decoration you would like to use
- PVA glue
Abbreviations (US Terms)

- MR – magic ring
- SLST – slip stitch
- Unf. – unfinished
- ST – stitch
- Ch – chain
- SP – space
- SK – skip
- HDC – half double crochet
- SC – single crochet
- DC – double crochet
- 2DCtog – crochet 2 double crochets together
- FPSC – front post single crochet
- ExtFPDC – extended front post double crochet
- 6ExtFPDCtog – 6 unfinished extended front post DC crochet together
- PUFF ST – Yarn over and insert your hook into the specified stitch/space. Yarn over again and pull up a long loop. (Yarn over and insert your hook into the same stitch/space. Yarn over again and pull up a long loop) two or three more times. Yarn over and pull through all 7 or 9 loops on your hook (depends how big your Puff st needs to be).
Mandala Crochet Pattern
Round 1
Your mandala will start from magic ring.
Ch5 (counts as DC + Ch2).
Continue with DC + Ch2 till you have 7 DC in MR and that includes Ch3 that counts as 1st DC. Please check that before next round or your mandala can get more than 7 petals.
Join with SLST into 3rd Ch of initial ST.
Round 2
! If you close Puff ST with Ch1, then you make Ch4, it makes Ch5 total!
SLST to Ch2 SP, make a loop and crochet Puff ST in Ch2 SP, Ch5.
(Puff ST, Ch5) – repeat till the end. Join with SLST into the top of Puff ST.
Round 3
FPSC around PUFF ST + Ch2 = ExtFPDC, 7 DC in Ch5 SP.
(ExtFPDC around Puff ST, 7 DC in Ch5 SP) – repeat till the end.
Join with SLST.
Round 4
! If you close Puff ST with Ch1, then you make Ch4, it makes Ch5 total!
FPSC around initial ST + Ch2 = 1st ExtFPDC, Ch4, skip 3 ST and make Puff ST in 4th ST, Ch4, skip 3 ST and make ExtFPDC around ExtFPDC.
(Ch4, skip 3 ST and make Puff ST in 4th ST, Ch4, skip 3 ST and make ExtFPDC around ExtFPDC) – repeat till the end.
Join with SLST into 2nd Ch of initial ST.
Round 5
SLST to Ch4 SP, Ch3 (counts as 1st DC), make 4 DC in next Ch4 SP, ExtFPDC around Puff ST, 5 DC in next Ch4 SP, Ch3.
(5 DC in Ch4 SP, ExtFPDC around Puff ST, 5 DC in next Ch4 SP, Ch3) – repeat till the end.
Join with SLST into initial ST.
Round 6
Ch3 (counts as 1st DC), make DC in next 2 ST, Ch2, take a smaller hook and skip 2 ST, crochet a crystal into 3rd ST, change back to main hook and make Ch2, skip 2 ST and make DC in next 3 ST, Ch3.
(DC in next 3 ST, Ch2, skip 2 ST and crochet a crystal into 3rd ST, Ch2, skip 2 ST, DC in next 3 ST, Ch3) – repeat till the end.
Join with SLST into initial ST.
Round 7
FPSC around initial ST + Ch2 = 1st ExtFPDC, ExtFPDC around next 2 ST, Ch2, crochet crystal in Ch2 SP, Ch2, crochet crystal in Ch2 SP, CH2, ExtFPDC around next 3 ST, Ch3.
(ExtFPDC around next 3 ST, Ch2, crochet crystal in Ch2 SP, Ch2, crochet crystal in Ch2 SP, Ch2, ExtFPDC around next 3 ST, Ch3) – repeat till the end.
Join with SLST into initial ST.
Round 8
FPSC around initial ST + Ch2 = 1st ExtFPDC, ExtFPDC around next 2 ST, Ch2, crochet crystal in Ch2 SP, Ch2, crochet crystal in Ch2 SP, Ch2, crochet crystal in Ch2 SP, CH2, ExtFPDC around next 3 ST, Ch3.
[ExtFPDC around next 3 ST, (Ch2, crochet crystal in Ch2 SP) repeat 3 times = 3 crystals, Ch2, ExtFPDC around next 3 ST, Ch3) – repeat till the end.
Join with SLST into initial ST.
Round 9
FPSC around initial ST + Ch2 = 1st ExtFPDC, ExtFPDC around next 2 ST, (Ch2 + crochet crystal in Ch2 SP) x4, Ch2, ExtFPDC around next 3 ST, Ch3.
[ExtFPDC around next 3 ST, (Ch2, crochet crystal in Ch2 SP) repeat 4 times = 4 crystals, Ch2, ExtFPDC around next 3 ST, Ch3] – repeat till the end.
Join with SLST into initial ST.
Round 10
FPSC around initial ST + Ch2 = 1st ExtFPDC, ExtFPDC around next 2 ST, (Ch2, crochet crystal in 2nd Ch2 SP, CH2, crochet crystal in Ch2 SP, Ch2, crochet crystal in Ch2 SP) = 3 crystals, Ch2, skip Ch2 SP, ExtFPDC around next 3 ST, Ch3, make DC in Ch3 SP, Ch3.
[ExtFPDC around next 3 ST, (Ch2, crochet crystal in 2nd Ch2 SP, Ch2, crochet crystal in Ch2 SP, Ch2, crochet crystal in Ch2 SP) = 3 crystals, Ch2, skip Ch2 SP, ExtFPDC around next 3 ST, Ch3, make DC in Ch3 SP, Ch3] – repeat till the end.
Join with SLST into initial ST.
Round 11
FPSC around initial ST + Ch2 = 1st ExtFPDC, ExtFPDC around next 2 ST, (Ch2, crochet crystal in 2nd Ch2 SP, Ch2, crochet crystal in Ch2 SP) = 2 crystals, Ch2, skip Ch2 SP, ExtFPDC around next 3 ST, Ch3, make DC in 2nd and 3rd Ch of Ch3 SP, DC in next ST, DC in 1st and 2nd Ch of Ch3 SP, Ch3.
[ExtFPDC around next 3 ST, (Ch2, crochet crystal in 2nd Ch2 SP, CH2, crochet crystal in Ch2 SP) = 2 crystals, Ch2, skip Ch2 SP, ExtFPDC around next 3 ST, Ch3, make DC in 2nd and 3rd Ch of Ch3 SP, DC in next ST, DC in 1st and 2nd Ch of Ch3 SP, Ch3] – repeat till the end.
Join with SLST into initial ST.
Round 12
FPSC around initial ST + Ch2 = 1st ExtFPDC, ExtFPDC around next 2 ST, Ch2, crochet crystal in 2nd Ch2 SP, Ch2, skip Ch2 SP, ExtFPDC around next 3 ST, Ch5, make DC in 3rd Ch of Ch3 SP, DC in next 5 ST, DC in 1st Ch of Ch3 SP, Ch5.
(ExtFPDC around next 3 ST, Ch2, crochet crystal in 2nd Ch2 SP, Ch2, skip Ch2 SP, ExtFPDC around next 3 ST, Ch5, make DC in 3rd Ch of Ch3 SP, DC in next 5 ST, DC in 1st Ch of Ch3 SP, Ch5) – repeat till the end.
Join with SLST into initial ST.
Round 13
FPSC around initial ST + Ch2 = 1st ExtFPDC, ExtFPDC around next 2 ST, Ch2, skip Ch2 SP+crystal+Ch2 SP, make ExtFPDC around next 3 ST, Ch7, make DC in 5th Ch of Ch5 SP, DC in next 7 ST, DC in 1st Ch of Ch5 SP, Ch7.
(ExtFPDC around next 3 ST, Ch2, skip Ch2 SP+crystal+Ch2 SP, make ExtFPDC around next 3 ST, Ch7, make DC in 5th Ch of Ch5 SP, DC in next 7 ST, DC in 1st Ch of Ch5 SP, Ch7) – repeat till the end.
Join with SLST into initial ST.
Round 14
FPSC around initial ST+Ch2=1st ExtFPDC, ExtFPDC around next 2 ST, skip Ch2 SP, ExtFPDC around next 3 ST, Ch9, make DC in 7th Ch of Ch7 SP, DC in next 9 ST, DC in 1st Ch of Ch7 SP, Ch9.
(ExtFPDC around next 3 ST, skip Ch2 SP, ExtFPDC around next 3 ST, Ch9, make DC in 7th Ch of Ch7 SP, DC in next 9 ST, DC in 1st Ch of Ch7 SP, Ch9) – repeat till the end.
Join with SLST into initial ST.
Round 15
FPSC around initial ST+Ch2=1st ExtFPDC + next 5 ExtFPDC crochet together, Ch11, make DC in 9th Ch of Ch9 SP, DC in next 11 ST, DC in 1st Ch of Ch9 SP, Ch11.
(6ExtFPDCtog, Ch11, make DC in 9th Ch of Ch9 SP, DC in next 11 ST, DC in 1st Ch of Ch9 SP, Ch11) – repeat till the end.
Join with SLST into top of 6ExtFPDCtog.
Round 16
FPSC around 6ExtFPDCtog+Ch2=1st ExtFPDC, Ch10, make DC in 11th Ch of Ch11 SP, DC in next 13 ST, DC in 1st Ch of Ch11 SP, Ch10.
(ExtFPDC around 6ExtFPDCtog, Ch10, make DC in 11th Ch of Ch11 SP, DC in next 13 ST, DC in 1st Ch of Ch11 SP, Ch10) – repeat till the end.
Join with SLST.
Round 17
FPSC around initial ST+Ch2=1st ExtFPDC, make 11 DC in Ch10 SP, DC in next 15 ST, make 11 DC in Ch10 SP.
(ExtFPDC around next ST, make 11 DC in Ch10 SP, DC in next 15 ST, make 11 DC in Ch10 SP) – repeat till the end.
Join with SLST.
Round 18
Ch4 (counts as 1st DC+Ch1), skip next ST and make DC, Ch1, skip next ST and make DC, Ch1.
(Skip next ST and make DC, Ch1) – repeat till the end.
Join with SLST.
Round 19
Ch4 (counts as 1st DC+Ch1), skip Ch1 SP and make DC in next ST, Ch1, skip Ch1 SP and make DC, Ch1.
(Skip next Ch1 SP and make DC, Ch1) – repeat till the end.
Join with SLST.
Round 20
Note! The chain space from round 19 shall be in front of your hook. The DC will have the chain space from round 18 inside!
Ch1 and make SC in the same ST, 1 long DC between R18 and R19 into skip ST from R17.
(Make SC in next DC, 1 long DC between R18 and R19 into skip ST from R17) – repeat till the end.
Join with SLST.
Round 21
Ch1 and make HDC in the same ST.
(1 HDC in every ST) – repeat till the end.
Join with SLST.
Round 22
Remember! All stitches are done in 3rd loop only!
Ch3 and make DC into the last 3rd loop only from previous R21 in front of the work, skip 1st ST and make DC in next 3rd loop only, next DC goes into just skipped ST in front of the work.
(Skip next ST and make DC into 3rd loop only, now you make next DC into just skipped ST 3rd loop only in front of the work) – repeat till the end.
Join with SLST.
Round 23
Ch3 and make DC into ST from previous R22 in front of the work, skip next ST and make DC, next DC goes into just skipped ST in front of the work.
(Skip next ST and make DC, next DC goes into just skipped ST in front of the work) – repeat till the end.
Join with SLST.
Round 24
Ch3, make DC between two X and crochet it together with just made Ch3, Ch3, unfinished DC in the same SP, next unfinished DC goes in next SP between two X = crochet them together.
Repeat till the end.
Attaching to the hoop
Finally, your mandala is ready to be placed on the hoop.
You can attach it with some yarn pieces or stitch markers.
You will attach your mandala by crocheting 3 SC into Ch3 SP only.
Fasten off and hide the yarn tale.
You can make this place safer by putting small drop of PVA glue to this spot. It will hold your tale in place.
Video Tutorial
If you find more insides on how to make the mandala – feel free to refer to our video tutorial on YouTube.
Mandala Poinsettia PDF Pattern
If you want to get printable PDF pattern with instructions and pictures for each round, it can be purchased from one of our stores:
Conclusion
Wrapping up, the Poinsettia Mandala crochet pattern stands as a splendid celebration of the festive season, merging the warmth of holiday traditions with the craft of crochet. It transforms yarn into a masterpiece that captures the essence of the holidays, making it an ideal project for crocheters at any level. If you are ready for more challenges, check out our free coasters crochet pattern. If you liked this mandala, you may also like our other mandala – Star Flower.